Monday 2 September 2013

Sunday afternoon delight

You know those times when you're feeling a little sorry for yourself and all you want is a little sweet treat, but you don't want something processed or fake or too big or too sweet? That was me yesterday afternoon.

I was laying on the couch and just felt like nothing in my cupboard would compare to having a cup of tea and a homemade biccie. So I donned my apron and got in to the kitchen. I do love a good Sunday afternoon random baking sesh!

I have made these biccies before but with dates and pecans and they were the easiest, most care free biccies I've ever made! I didn't have pecans or dates this time around, but I did have a banana and some left over chocolate melts from last weeks brownie mix. What better flavour combination could there be?!

Laura's Choc-Dipped Banana Biccies (makes about 40 little biccies)
1 large banana
1 cup brown sugar, firmly packed
1/2 cup olive oil
1 egg
1 tsp vanilla extract
3/4 cup SR flour
1 1/4 cup plain flour (for the date/pecan recipe I only used 3/4 cup, but the banana means it needs more flour)
1 tsp cinnamon
150 g melting chocolate

1. Mash the banana to a smooth consistency. Preheat oven to 180C and line 2-4 baking sheets with paper.
2. Place sugar, oil, egg and vanilla in a bowl and mix to combine. Add banana and stir.
3. Add flours and cinnamon and stir to combine.
4. With damp hands, roll teaspoons of dough into balls and place on the baking paper. Flatten slightly with your fingers and bake for 12 minutes or until golden. Cool on a wire rack.
5. Heat chocolate in the microwave in 30 second intervals until all melted. Once your biccies are cool, invert and dip into the chocolate and leave to harden.
The finished product!

I love that I can say there are NO pressure points in this recipe - it is so easy!

Take on this recipe when you:
a) Want to have a little sweet treat on a Sunday arvo to go with your cuppa
b) Have unexpected guests arrive on your doorstep and have nothing in the cupboard (they're super quick!)
c) Are looking for brownie (or rather, biccie) points from work colleagues, family, boyfriend etc.

Enjoy!

Wednesday 3 April 2013

A foolproof end to your next dinner party.

This blog post has been a long time coming. I do have a multitude of excuses for why I have been M.I.A. in the past 3-plus months - I was busy with Christmas, New Years, and starting back at work; and I've been totally loved up and planning the wedding of the century with my significant other. But the best excuse of all of them is my foodie one... I started a business!! I'm working market stalls on a regular basis selling my sweet baked treats and doing quite well, if I do say so myself! So I hope that gets me off the hook with being blogless for such a long time.

So, what could be worthy of getting away from my super busy schedule to blog? Choc-mint fondant, of course!

Before Christmas, my awesome friend K took me to a cooking class at Sydney Cooking School (Note: best birthday present ever!!). We chose 'Delicious Desserts' to learn how to make 5 new desserts neither of us had attempted before and first up was chocolate fondant. This was introduced to us as the "fool proof" dessert and that couldn't be more true. There are a few pressure points I will explain at the end but here it is:

Chocolate Fondant (Serves 4)
120g good quality dark chocolate (I use Nestle plaistowe)
120g unsalted butter
2 eggs
2 yolks
60g sugar
10g plain flour

1. Grease and lightly flour 4 metal dariole moulds.

2. Place chocolate and butter in a bowl over a pot of simmering water to melt. Whisk to combine.

3. In another bowl, add egg, yolk and sugar and whisk until foamy.

4. Remove chocolate from heat once melted, stir, then add to egg mixture and stir.
5. Add flour, stir to combine, then pour into moulds.
6. Refrigerate for 1 hour. Preheat oven to 220C before the end of the hour.

7. Bake in oven for 8 minutes. Remove from oven and rest for 5 minutes. Serve warm with cream or ice cream.
The perfect turn out.

The final gooey goodness.
Now, I LOVE mint chocolate. It is definitely one of my favs. So when I had to make this for a dinner party, I figured I'd add a little peppermint essence (1 tbsp for a 4 serve) to the mix... and it worked! So some other suggestions I have for you - Jaffa  (add up to 1 tsbp orange essence), Choc-coco (add 1 tsbp coconut essence) and one that I think I'll try next time is a Choc-berry where I think I'll just add some blended, sieved frozen raspberries to the mix!

So, for your pressure points and tips on this no tricks dessert:
- You can't over whisk the eggs and sugar in step two - just keep whisking until your chocolate is melted.
- You MUST refrigerate this dish for at least an hour, longer if possible, but not more than 7 hours (it will set too hard).
- You MUST grease and dust your dariole moulds, I like to do mine with cocoa powder so I don't get the white powder on the outside of my chocolate baked goods.
- You unfortunately need to eat these when they've just been cooked... I saved one for my flat mate who ate hers half an hour later and it had set in the centre (She deducted me 4 whole points from a perfect 10 because it wasn't gooey!!)
- The recipe I was given said to bake for 8 minutes, but it really does depend on your oven as mine ended up being in there for about 12 minutes. If they're still gooey at the top after 8 minutes, keep a close eye on them because there is a fine line between just set on the outside, and set the whole way through!

Good luck fondanting! Let me know your favourite fondant combinations.

Enjoy!

Tuesday 4 December 2012

A lunch with Zumbo

My Mum recently informed me of the long table lunch - a three course meal - being held being held at Bannisters restaurant in Mollymook that was to be hosted by none other than my patissier idol, Adriano Zumbo. It was a launch party for his new book and you can imagine my excitement when I got her message. However, it was proceeded with the disappointing comment "Shame we'll both be at work...". Speak for yourself Mumma!! I'm not missing this for anything! Luckily for me, we were both able to arrange the day off. Also luckily for me is the fact that my family hail from Ulladulla, just around the corner from the restaurant. So off to Bannisters we went!


It was a magical day weather-wise and, for those of you who've been to Bannisters, you'll know that this just makes the view that much more spectacular. We were running a little late and most tables were already full by the time we got there, but there was one table with reserved signs all along it, save for two seats at the end. Sitting down to enjoy the wine included in the lunch, AZ arrived and I have to say, I was just a little star struck and started taking a few pap-style photos.


He made his way through the entrance, being introduced to the managers, chefs and waitstaff and straight towards our table. The reserved signs began to make sense - AZ was sitting ON OUR TABLE!!!

He was more than happy to talk to the people at our table and share his stories of Macarons and Masterchef (one couple had a daughter who had been in the first series of Junior Masterchef, so you can imagine the stories they had to share) while we were served entree - Lobster, foie gras, avocado and beans. I wasn't aware of this when we paid for the lunch, but Adriano wasn't actually in the kitchen, it was prepared by Bannister's chefs. This wasn't so bad though, as we got to see that he too takes photos of his food haha! I had never eaten foie gras before, but it was delicious! I can totally see what everyone raves about. Really salty, buttery soft and paired perfectly with the mild tasting lobster.

Mains came next which was Barramundi with clams (actually pippis), peas, asparagus and parsley. Again, this was delicious. The fish was cooked to perfection (though as a 'seafood speciality' restaurant, should I have expected any less?) and the clams (again, which I had never had before) were very tasty.

Then it was time for a Q & A with Zumbo. As you can imagine, the majority of the questions centred around how to get the perfect macaron, along with the many failed attempts that people have had trying to construct these sweet treats. In case you were wondering, or you have had a failed attempt, "it's all about the egg whites". He was asked about his path into the patisserie world and happily obliged with a story of growing up in a supermarket in Coonamble and finding his passion for baked goods in the form of packet cake mix. One lady made a silly comment that he had "sold out" by releasing his product to  He was really charming and funny and different to what I had expected - seeing him on Masterchef had made me think he was quite shy or stand-offish, but this was far from accurate. He also dished out some great advice on following your passion and living your food dreams which I thought was great.

The dessert was served after this - Creme brulee with fresh berries - followed by tea and coffee and, of course, the famous macarons.

He also did a book signing and had photographs with everyone which was really good. He really was a down-to-earth, friendly guy who hasn't let success go to his head.
While meeting the big Z was the best part of the day, the food was impeccable. If you haven't had the chance to get to Bannisters to enjoy the Rick Stein seafood experience, do yourself a favour and get down there ASAP!

Also if you haven't had a chance to get to one of Adriano Zumbo's 5 stores in Sydney (Balmain, Rozelle, Manly, Star City and Bronte/Waverley), WHAT ARE YOU WAITING FOR?? Go and get your sugar fix!

Enjoy!

Saturday 10 November 2012

The perfect afternoon tea accompaniment

It has been a while since my last blog post. Lots of things have been happening in the world of the curious culinarian. Unfortunately, not many of them have had to do with me whipping up interesting creations in the kitchen (I have suffered through steak/chicken and salad since we returned from Sri Lanka all those weeks ago). So, needless to say, I have been itching to find the time to test out some recipes and my first is outlined here.

Flicking through a lifestyle magazine the other day, I came across their "classic cakes" section, which included a sponge cake. I have ALWAYS wanted to try and make a sponge. It's something that looks so dainty and sweet, but seems to have an air of difficulty surrounding it... Or maybe that's just the air within it. A sponge, obviously, gets its name from its light, airy, dare I say "spongy", texture and a Victoria Sponge, as the one below will be, is two layers of the airy cake, separated by a layer of raspberry jam and whipped cream.

For all the hype surrounding the humble sponge, I have to say it really wasn't difficult. I don't know how the Country Women's Association would have rated my creation, but my colleagues sure gave me sufficient praise. Anyway, here is the recipe I used with pressure points to follow.

Victoria Sponge Cake (serves 12)
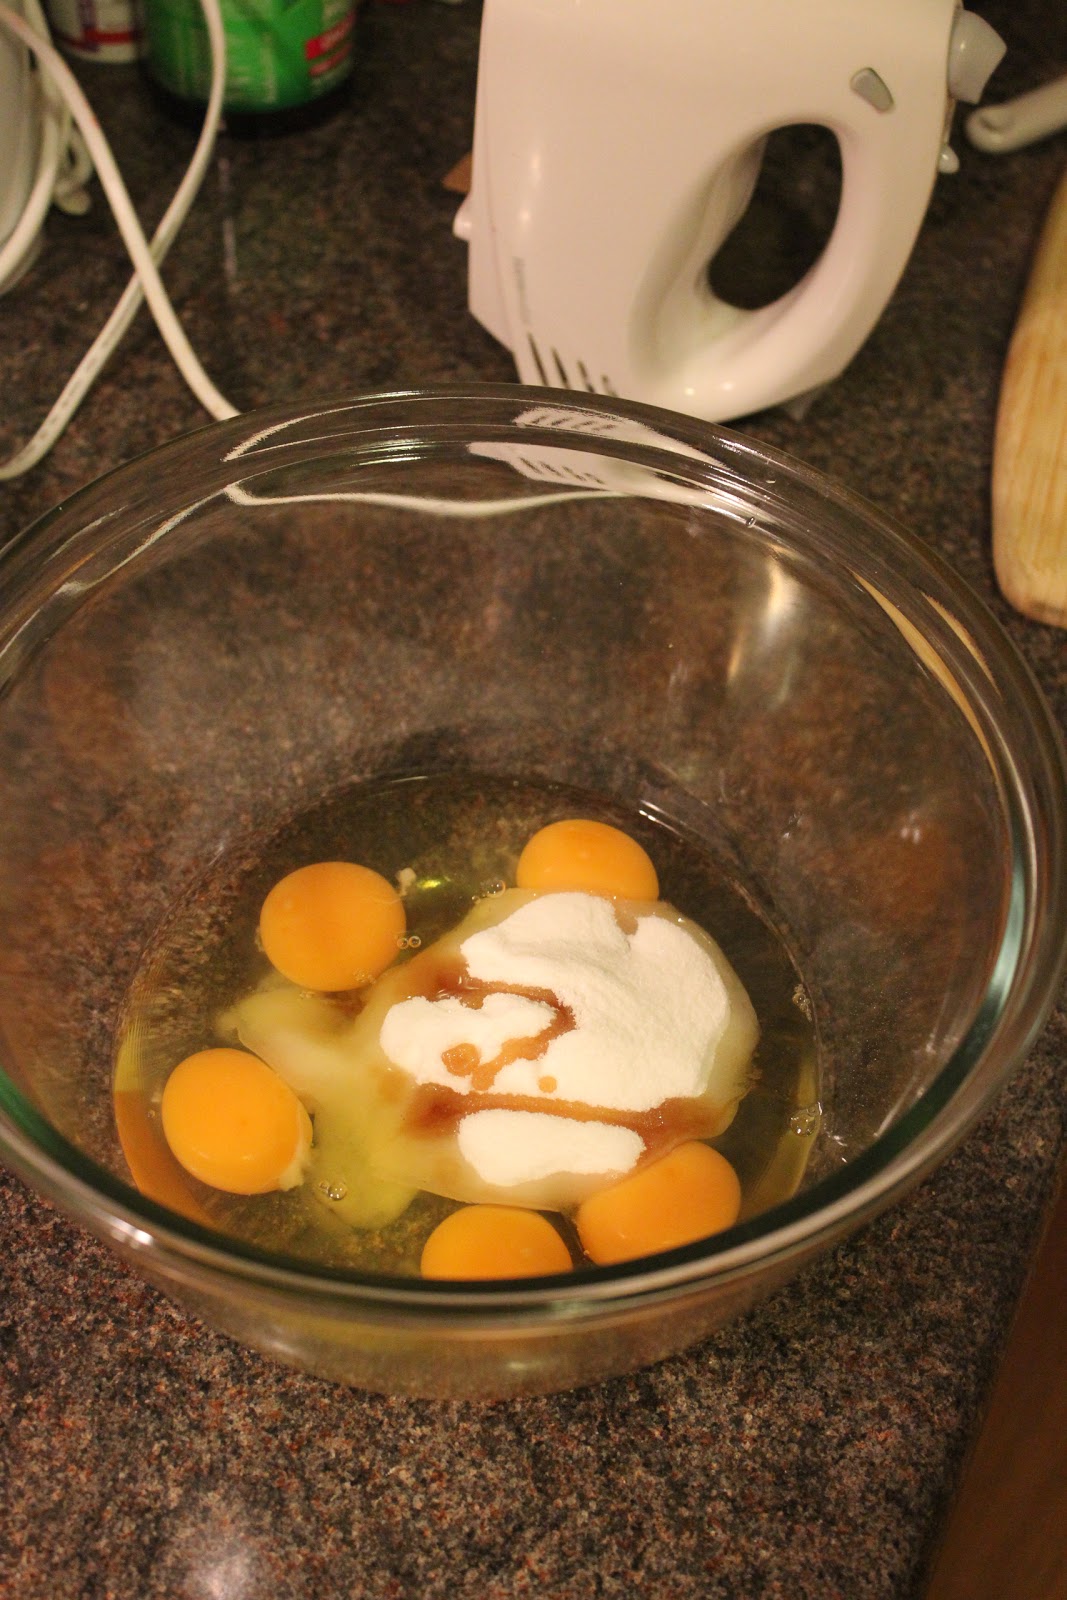
5 eggs
3/4 cup caster sugar
1 tsp vanilla extract
1/2 cup plain flour
1/2 cup self raising flour
1/4 cup cornflour
1 tbsp boiling water
300 mL thickened cream, whipped
1/3 jar jam (I used a mix of strawberry and blackberry, but any jam would do)

1. Preheat oven to 160 C fan-forced and grease and line two 20 cm cake pans (I used springform pans as they are easy removal).
2. Using an electric mixer, beat eggs (ferociously) with sugar and vanilla for 10 minutes, until thick and creamy and sugar is dissolved (see pictures).
All in together and WHIP IT GOOD!
Using a whisk, gently fold the flour through your egg mix.
3. Sift flours together three times to aerate the flour and therefore your final cake. Using a whisk or cake spatula, fold flour into egg mixture. Fold in boiling water. Divide between prepared pans and bake for 25 minutes or until springy in the centre. Cool tins on a wire rack lined with baking paper, then remove from pans and cool on paper completely.
Springform pans make for easy removal
Your cakes should be golden and risen, but flat on top
4. Place one sponge on your serving plate, right side up. Top with jam, then cream (make sure you don't push your cream all the way to the edges to allow for squashing). Top with remaining sponge and sprinkle with icing sugar to serve.  
The finished product
Before I go any further, I must confess that this isn't what the sponge looked like when I arrived at work, ready to serve it to my colleagues. Those people who know me, know that sometimes there isn't much forward thinking that goes on in my head, and this happened to be one of those occasions. I didn't clingwrap the cake, for fear of ruining the icing sugar topping and squishing the layers together, so just had it placed on the floor of my car while driving to work. Going around the first corner, I realised this was a stupid mistake. The jam and cream had a lovely old time slipping and sliding all over the place, but I managed to drive just slowly enough that it remained in one piece. Until I got to work, that is... The steep driveway, combined with a sharp turn into the carpark sent my sponge flying!! The top came off, jam and cream went all over the plate and icing sugar dusted my car floor... Nice work! Lucky I am queen of damage control!!

Now, I know I said I got adequate praise for this cake (actually a few ladies told me they NEVER make sponge cake because they find it so difficult and they were shocked that it was my first attempt). However, aside from the little spillage, I don't personally think it was the best sponge I've ever had and I know I could probably improve.

So, where would I change my approach next sponge-making occasion? Firstly, I think it could have been a bit more spongy. Whether that means adding a little baking powder, or using 1 cup self raising flour instead of the half cup plain flour, or adding the flour to the egg mixture bit-by-bit so that it isn't over mixed? I'll find out and let you know.

In the meantime, have a go at this easy sponge - I promise it will be a crowd pleaser and the perfect accompaniment to a cup of English breakfast tea! (The Queen would be quite impressed).

Enjoy!

Monday 8 October 2012

Livin' la vida Lanka

The promise of two weeks of the best curries and the fact that you are encouraged to delve into dishes with nothing but your right hand was more than enough to attract this curious culinarian to the land of the lion (not that are even any lions still around).

The Fiance and I were Sri Lanka-bound and couldn't have been more excited to experience the sights, and tastes, of a country that very few tourists have been lucky enough to venture to. (I can't say that our holiday-eve engagement didn't have just a little to do with our excitement also though).

Prior to our travels, we researched the food fare we would be likely to experience (thanks Food Safari!) and found that rice and curry is pretty much the meal for breakfast, lunch and dinner. But this isn't just some chicken sitting in a semi-spiced liquid with a ball of rice. This is deliciously creamy curry, rich in spices and chicken, beef or fish and served with an array of accompaniments such as dhal, spiced pumpkin or potato, jackfruit, coconut sambol and kale, as well as crispy pappadoms or parathas (something like an indian roti bread).
Chicken curry, vegetable curry, kale and coconut salad, spicy bean curry and dhal
Fresh fish curry (straight from the lake at Tissa), chilli, cucumber salad, dhal, spiced potato and pumpkin curry.

Chicken curry, spiced jackfruit, eggplant, coconut sambol and dhal.
Fresh fish (from the stick fisherman at Mirissa), cripsy fried pappadoms, potato curry, coconut sambol, bean curry, rice and salad
Chicken curry, chillis, dhal, pumpkin curry and kale and coconut salad.
These curries are spectacularly flavoursome, and the fact that you eat them with your hands just enhances the flavours even further. However, the best part about a good rice and curry is that the whole dish costs about 150 Rs ($1.10). At hotels or guest houses, you'll find slightly more expensive varieties, but they still only cost about 650 Rs ($5). Although this is seen as the staple, there are many other dishes that excited our senses, as you will see below.

As you drive through the townships set up all over Sri Lanka, you find thousands of roadside stalls selling the freshest and widest variety of fruit and vegetables I have seen in a developing country. Everything from beans to avocados to eggplants to bananas and watermelons to pumpkins and potatoes. One other thing you can buy is king coconuts. These cost around 40 Rs ($0.20) and are cut up fresh in front of you. Once you have finished off the juice, the coconut is halved, a coconut spoon is cut for you and you can scoop out the juicy flesh. As well as three coconuts, I also bought 2 kilos of bananas at this stall and the whole thing cost me less than $2!!
King coconuts being sold on the side of the road.
Another dish that is very popular in Sri Lanka is Kottu Roti, a street food composed of shredded pieces of roti bread mixed with vegetables, egg, spices and your choice of meat. As you walk past these street vendors, you can hear the tell-tale sounds of the metal spatula hitting the hot plate and mixing your meal, and you know you're in for a good feed.
Kottu chicken


Breakfast curries, although similar in flavour to the dinner varieties, tend to be a little different in terms of side dishes. Breakfast consists of string hoppers and/or egg hoppers - both of which are made with rice flour and steamed (string hoppers) or fried in a small wok (egg hoppers) - as well as a vegetable curry and sambol. This is a great way to kick start the day, but much more filling than the standard eggs or museli that I usually go for.

Sri Lankan breakfast - string hoppers, egg hoppers, curry and coconut sambol.

Another great thing about Sri Lanka is the coast, and the abundance of fresh (and cheap) seafood that can be found at any of the coastal towns. Our beach-side stop off was Mirissa (South), and offered us a variety of choice for restaurants. However we settled on the one that we saw bringing in a fresh catch straight from the ocean. Coconut prawns, lemon butterfish and two grilled lobster were our choices and couldn't have been more delicious! This meal cost us about 6000 Rs ($45), including a tip and cocktails... Bargain!
Lemon Butterfish

Grilled lobster
Lastly, if you're heading to Sri Lanka (and I don't know why you wouldn't be jumping online to buy a ticket after seeing all this delicious food), I would recommend checking out the Galle Face Hotel for the sunset, cocktails and the seafood buffet - at 1890 Rs ($15) per person, you really can't go wrong!

Fresh grilled crab topping a plate of pineapple glazed pork, devilled fish and much more.
Sri Lankan food has left me with such a craving for a good curry and super fresh seafood... I could be going back for round two very soon!

Enjoy!

Thursday 6 September 2012

Revivng a childhood favourite... With a bachelorette twist.

I don't know about you, but memories of my childhood more often than not revolve around food. Among the endless food memories I have, some of the best include coming home from school in summer and grabbing a Zooper Dooper from the freezer (raspberry or cola were always my first choice), or in winter with mum cooking up pikelets with butter and jam. But one of my favourites is opening my lunch box and getting a waft of honey before seeing the characteristic white and pink icing that I loved so much. I am, of course, talking about Honey Jumbles.

I don't like to play favourites with my Arnott's biscuits - how could you possibly pick between a Monte Carlo, a Kingston, a Spricy Fruit Roll, an Iced VoVo? But if I had to choose, I would go for Honey Jumbles almost every time. I had a conversation with the BF about this the other day and was almost speechless when he told me that when his Grandma would buy Arnott's Assorted Creams, he would always go for the Orange Slice. "Nobody likes orange slice!!" I replied. He then proceeded to tell me that it was a strategic move to get more biscuits while his cousins were fighting over the delta creams. Clever boy.

Anyway, Honey Jumbles have always been a massive hit whenever I have made them (they are pretty much just like ginger bread, without the need to use a rolling pin). So, being my best friend Amy's bachelorette party this weekend (termed 'bachelorette' at her request), I decided to pull out my faithful homemade honey jumble recipe and get creative with my shaping... If you know what I'm getting at.

In an effort not to scare off any of my readers, I did make some 'normal' shaped biscuits as well, and that's what I've photographed.

Honey Jumbles (makes about 20)
60g butter, chopped
1/2 cup honey
1/4 cup firmly packed brown sugar
1 1/2 cups plain flour
1/2 teaspoon bicarbonate of soda
1 teaspoon ground ginger
1/2 teaspoon mixed spice
1/4 teaspoon ground cloves
2 teaspoons milk

1 eggwhite
1 1/2 cups pure icing sugar, sifted
2 teaspoons lemon juice
Pink food colouring

1. Combine butter, honey and sugar in a saucepan over medium heat. Cook, stirring, for 3 minutes or until butter has melted. Bring to the boil. Remove from heat. Set aside for 10 minutes.
2. Sift flour, bicarbonate of soda, ginger, mixed spice and cloves over butter mixture. Add milk. Stir to combine. Cover. Set aside for 1 hour or until mixture has cooled and thickened.
3. Preheat oven to 160°C fan-forced. Line 2 large baking trays with baking paper. Turn dough out onto a lightly floured surface. Knead lightly. Divide dough into quarters. Roll 1 portion into a 25cm-long log shape. Cut into 5cm-long pieces. Place on prepared trays, leaving room for spreading. Using a wooden spoon, flatten each piece of dough until 5mm-thick. Repeat with remaining dough portions. Bake for 7 to 9 minutes or until light golden. Stand on tray for 10 minutes. Transfer to a wire rack to cool completely.
4. Make icing Using: a whisk, beat eggwhite in a bowl until foaming. Gradually beat in icing sugar until combined. Stir in lemon juice. Spoon half the mixture into another bowl. Tint pink with food colouring. Spread half of the biscuits with pink icing. Spread remaining biscuits with white icing. Set aside for 30 minutes or until set. Serve.

These are perfect with a cup of tea, but I have to say I'm probably more likely to be having a glass of champagne in my hand and taking lots of hilarious photos while eating the specially shaped ones on the weekend.

Enjoy! 

Wednesday 5 September 2012

Serious cake damage-control

I promised my year 12 class at the start of the year that they could request their favourite cake for their birthdays and I would bake it for them. I know, I know. Stupid, right? It was a heat-of-the-moment, snap decision, but at least it has resulted in me being able to test out some interesting cakes (see Black Forest cake) that I would have never considered baking before.

So I have finally come to baking my final cake and, of course, another cake I've never made before - Carrot cake. I know from previous eating experiences that Carrot cake can be a bit hit-and-miss. Too dry, too moist, too much carrot, not enough carrot, too "healthy" tasting, the list goes on. So the troll was on to find the perfect cake. I thought I had found one. Now, I don't like to brag, and I'm not trying to say that I'm Australia's next Masterchef - I definitely make my share of not quite there meals - but I don't get it horribly wrong all that often. But alas, my tired state at 9.30pm last night left my cake lacking. A lot. Hence, "serious cake damage-control".

Firstly, I bought light cream cheese. Don't ask me why I bothered with this, considering the amount of sugar and oil, but trust me, I've learnt my lesson. Thin, runny cream cheese icing is not that pleasant. It's also not that easy to work with, as you'll soon read.

I try not to skewer my cakes when baking, I more just go for the bounce-back feel and then take the cake out. This leads me to problem number two. I mustn't have been paying too much attention when I took one of the cakes out of the oven. I left them to cool on a wire rack over night, only to wake up this morning and find that one cake had sunken a little, and was a little too 'moist' (read: undercooked) in the middle. First stage of damage control - try to cook that bit! I turned on the grill first, but then reconsidered that when I realised it would crisp up the top of the cake as well. Time to try the oven. Luckily, this worked and the 'moist' bit cooked itself nicely.

Problem number three came in the form of trying to ice a still warm cake. I was short on time this morning before school (yes, I know, time management...) so didn't really have time to ice a completely cool cake after damage control number two. This, combined with the far too runny icing made for the worst iced cake I have ever seen!! Before I made it too much worse, I chucked in the fridge for damage control number three, just before serving. I re-iced and decorated with walnuts to hide the flaws. And voila...


Damage Control Carrot Cake (serves 10-12)
2 cups self raising flour
1 cup brown sugar
2 tsp cinnamon
1 tsp mixed spice (or ground nutmeg)
4 eggs
3/4 cup vegetable oil
1 tsp vanilla extract
2 1/2 cups finely grated carrot (about 2 large carrots)
1 cup (125g) crumbled walnuts

1 pack cream cheese (NOT LIGHT!!), softened
1/2 cup salted butter, softened (I didn't add this mine, but would definitely do it next time.

Up to 4 cups icing sugar
Extra walnut halves to decorate

1. Preheat oven to 180C and grease and line 2 20cm pans. 
2. Whisk together flour, cinnamon and mixed spice in a small bowl. In a large bowl mix eggs, oil, vanilla and brown sugar using an electric mixer. Slowly stir in dry ingredients and mix until well blended. Stir in carrots and walnuts. 
3. Divide mixture evenly into prepared cake pans. Bake for 35-40 minutes or until a skewer comes out clean (or cake springs back). Cool for 5 minutes in tins and then transfer to a wire rack to cool completely
4. Using a hand mixer, beat together cream cheese and butter until light and fluffy. Add icing sugar, half a cup at a time, until light, fluffy and thick. Spread on bottom layer of cake. Top with second cake and ice completely. Top with walnut halves to decorate. 

So, was my hard work and damage control rewarded with a resounding "WOW" from the year 12's? Well, no actually. The girl whose birthday it was actually truanted my class so she never even got to taste it!!! My faculty was pretty chuffed about it though...

Enjoy!