Sunday 29 July 2012

A sweet main meal


I felt very inspired last weekend when my lovely friend Carly made me her very own, very first, homemade gnocchi dish. Wanting to give it a whirl myself, but always willing to test something a little different, I opted for a sweet potato version. I wasn’t 100% sure this would even work. Would a direct substitute of a waxy potato for a sweet potato work? On the other hand, I didn’t have a backup dinner either, so I had no choice but to succeed... Or go and grab a burger from down the road (ie. Gnocchi was the only option!)
Until last weekend, I had always had a fear of homemade gnocchi. You hear many a horror story of how the gnocchi is tough or chewy or spongy. But I swear, from my experience, these are just kitchen urban legends. I can understand that there is a bit of room for error in this process, and I guess if you were a bit blasé about some of the steps, you could be steered down the tough-chewy-soggy path. However, if you follow the steps, take your time, and feel your food, all should go to plan! (*Note: success cannot be guaranteed... sorry!)  

Thankfully, my curiosity was rewarded and I found that, yes, you can substitute the white for the sweet variety. Therefore, if you have a preference of normal potato gnocchi, simply use the same amount of potato instead. The potato variety was supposed to serve 6, I guess because it’s a bit heavier, but this was enough for a decent sized meal for just Ryan and I... But we do have big appetites!

Sweet Potato Gnocchi with blue cheese sauce (Serves 2-4)
500g sweet potato
150g plain flour
½ cup grated parmesan
50g butter, melted

1 tbsp olive oil
2 cloves garlic, chopped,
100g baby spinach
100g mild blue cheese, chopped (try a gorgonzola)
1/3 – 1/2 cup cream (this will depend on how ‘blue’ you want your sauce to taste)

1. Wash and dry the sweet potato, then pierce the skin a few times with a fork. Place on a tray and into a preheated oven at 180°C for 1 hour, until tender in the thickest part. (Alternatively you could place the sweet potato in the microwave for 8-10 minutes, but I think the oven makes for a better flavour). Cool and peel (if it is ready, the skin should come off with your fingers).
Don't chuck out the skin - eat it!! It's so tasty and apparently packed with nutrients.
2. Sift flour onto a clean work surface. Pass the potato through a metal sieve (I used a metal oil splatter screen because it’s flat and easy to use) using pastry scraper. Add the potato to the flour. Add parmesan and season. Drizzle butter evenly over potato. 
3. Using a pastry scraper or the end of a plastic spatula, gradually work flour into potato to form a dough. Gently knead for 1-2 minutes until smooth. Add more flour if the mixture is too wet. 
4. Divide dough into four pieces and roll each piece into a long thin log. Cut into 2cm lengths.
5. Bring a saucepan of water to a gentle boil (over a medium-high heat). Cook gnocchi in batches, removing when it floats to the surface and transferring to a dish.
6. Heat oil in a large fry pan over a medium heat. Cook gnocchi, turning, for 1-2 minutes, until golden. Remove from pan.

7. Add garlic and sauté until fragrant. Add spinach and cook until wilted. Return gnocchi to pan to reheat then divide between dishes.
8. To make sauce, add cheese and cream to a pan and heat over low heat until melted and creamy. Drizzle over gnocchi and serve (or tip sauce over gnocchi and then serve).

Result? No horror stories to report - the gnocchi was perfect! So tender and sweet, and sufficiently cured my fear of homemade gnocchi (so much so that it makes me wonder why any restaurant that serves gnocchi could EVER put that rubbish packet stuff on the table in front of you!)

On the downside, my choice of stilton as the blue cheese was somewhat regrettable. It wasn’t inedible, but would definitely have been nicer had I used a milder version of the mouldy fromage (hence my suggestion of gorgonzola in the recipe).

Enjoy!

A twist of spain

Here we are again - another weekend, another fundraiser. This time was a little different in that I actually had to man the stall and see my sweet treats being sold (at least I HOPED to see them being sold, not just sitting there looking sad). Due to the success of my brownies last weekend (see "Fete-l" Chocolate), I decided to give them another try, adding in some white chocolate chips to make them extra special. But I also needed something else. Something different. Something that would stand out from the crowd of home-baked (and store-bought) fundraising goodies. Spanish orange syrup cakes sprang to mind. Perfect!

As luck would have it, my trip to check out the Sydney City Farm on Saturday resulted in possession of four of the juiciest organic oranges, and couldn't have come at a better time. This recipe would work with any citrus fruit, but I think something a little more bitter, like a grapefruit, may need a little more sugar and I would suggest only using the ruby red ones. Oh, and I have NO idea why this is classified as "Spanish" (maybe the addition of semolina gives it a little Spanish twist??) I wish I could say it was a family recipe, passed down from my great grandma, but I'm not that exotic. However, it may become something I pass down to my children one day... Let the legacy begin!

Spanish orange syrup cakes (makes 12)
2 medium navel oranges, peeled and roughly chopped
115g unsalted butter
1 cup caster sugar
2 eggs
60g almond meal, 60g semolina (or 120g almond meal)
60g self raising flour

1 peeled orange rind, from the chopped oranges
1/2 cup caster sugar
225ml water

1. Preheat oven to 160C (fan-forced). Place 12 muffin cases in a muffin tin.
2. In a saucepan, cover the oranges with water and simmer until tender, about 15 minutes. Cool then drain and puree in a food processor.
3. In a bowl, beat butter and sugar until light. Slowly beat in eggs.
4. Stir in the remaining ingredients, along with orange puree until well combined.
5. Spoon the mixture into cases and bake for 35 minutes. Remove from oven and cool.
Don't over-fill your cases. You want a nice flat cake that doesn't go over the paper edges.
6. To make syrup, thinly slice the orange rind, removing the pith. Cut the orange into thin strips.
7. In a pan, bring sugar and water to a simmer, stirring to dissolve the sugar. Add the orange strips and boil uncovered for 5 minutes. Spoon syrup over cakes and top with a slice of rind.

Ready for the sale table!
Having made these once before, I know how yummy they are - so moist and just the right amount of sweetness - so it was SO rewarding when they sold quicker than everything else at the stall. I even had someone come back to say how great she thought they were. After that kind of compliment, these cakes will be making a more regular appearance in my baking repertoire. Definitely a winner!

Enjoy!

Thursday 26 July 2012

Turning Japanese

Those who know me know two things about me and Japan... One, I have spoken Japanese for years and can still envisage myself moving there one day, or at least holidaying there another three times. And two, I looooove Japanese cuisine. Ramen is one of my all time favourites and I order it every chance I get just to take me back to those little alleyway ramen bars my boyfriend and I visited in Shibuya on our last trip there.

For me, the best type of ramen is tonkotsu - a broth created from pork bones that takes hours to cook and uses kilos of pork bits. Obviously, this isn't really a possibility for week night cooking and may even be a little ambitious on the weekends. Instead, to get my ramen fix, this is a really simple beef version that is weeknight-friendly and very satisfying to make (and probably a little lower in calories too!! If you care about that kind of stuff...)

Beef and noodle ramen (serves 2)
200g beef rump steak, thinly sliced
3 cups beef stock plus 3 cups water
3 tsp fish sauce
1 tbsp soy sauce
2 star anise
2 cinnamon quills
4cm piece ginger, cut into thick slices
1 stick organic ramen noodles (these are the dry ones but you can also use the soft pack, cooked ones)
2 Green onions (shallots), thinly sliced
1/2 cup coriander, chopped
100g Baby spinach, chopped
1 egg, hardboiled (This takes about 5-6 minutes from boiling)
6 bamboo shoots
1 tbsp sesame seeds
1/2 sheet nori (seaweed), chopped into 6 slices
Sesame oil
Chilli flakes
The perfect ingredients for a ramen feast.
1. Place beef stock, extra water, fish sauce, soy sauce, star anise and cinnamon in a large pot. Bring to the boil then reduce heat and simmer for 5 minutes. Remove bits.
Make sure your stock is nice and hot when you go to serve to cook your beef strips.

2. Cook ramen according to packet instructions. Drain and place in bowls.
3. Top with 100g beef, 1 shallot, 50g baby spinach, half a hard boiled egg, 1/4 cup coriander, 3 bamboo shoots, 3 slices nori, 1/2 tbsp sesame seeds, chilli flakes and a dash of sesame oil in each bowl.
4. Spoon hot stock over the prepared ingredients to cook the beef. Squeeze juice of half a lime into each bowl before serving.
Turning Japanese, indeed!
The real clincher for this dish is the addition of sesame oil (which the original recipe I looked at didn't include). Previous to this, it didn't have the best Japanese flavour and was a little bit flat.

Kamaboko
Some other garnish idea that you could include:
- Butter corn - melt some butter in a pan and quickly fry some canned or fresh corn
- Fried garlic - thinly slice a garlic clove and add to a wok or fry pan with a shallow coating of oil. Drain and dry before serving.
- Bean sprouts
- Shiitake mushrooms, thinly sliced
- Kamaboko (japanese fish cakes), thinly sliced

If you've never tried ramen before, what are you waiting for!?! This is such a satisfying dish and the fact that it is so easy to make just makes it even better. And if you ever get a chance to go to Japan, make sure you check out a ramen bar. They may look like a tiny hole-in-the-wall that can only fit 4 people, but as long as you are one of those 4, you will be eating one of the best meals you've ever tasted.

Enjoy!

Saturday 21 July 2012

Pie Time!

With my lovely friend Carly's recent house move came an invitation for dinner and a few wines. Carly decided on a delicious homemade gnocchi (yum!) and I offered to bring dessert. Having recently purchased my first loose-base pie tin, and given the chilly weather outside, what better dessert to provide as a house warming gift than a dark chocolate, pear and pecan pie? 

Dark chocolate, pear and pecan pie (serves 8-10, or two hungry girls on a cold winter's night)
2 large pears, peeled
165g caster sugar
150mL water
rind of 1 lemon
50g  dark chocolate, coarsely chopped
50g butter, diced
3/4cup golden syrup
3 eggs, beaten
1tsp vanilla extract
150g pecan nuts, chopped

RICH, SWEET SHORTCRUST PASTRY
175g plain flour
115g butter, diced or grated
2 tbsp caster sugar
1 egg yolk
2 tbsp chilled water

1. For pastry, sift flour into a mixing bowl and rub in the butter (see lessons). Stir in the sugar. Mix the egg yolk with the chilled water, add to the dough and mix with a butter knife until just mixed through. Knead on a floured surface for 1-2 minutes until smooth. Wrap in clingwrap and chill for 30 minutes.
Ready to rub

2. Preheat oven to 200C. Roll out the pastry and use to line 23cm fluted flan tin. Chill for 20 minutes, then line with foil or baking paper and baking beans or pie chains. Bake for 10 minutes. Remove beans and bake for 5 more minutes. Set aside to cool.
Baking blind.

3. Halve and core pears. Place 50g caster sugar in a pan with water and lemon rind. Bring to the boil. Add pears. Cover, lower heat and simmer for 10 minutes. Set pears aside to cool and discard the liquid. Cut pears lengthways. Arrange in your pastry case.

4. Melt butter and chocolate in a bowl over a saucepan of simmering water. Set aside to cool slightly.
5. In a separate pan, heat the remaining sugar and golden syrup until most of the sugar is dissolved. Bring to the boil and simmer for 2 minutes.
6. Whisk the eggs into the cooled chocolate, then whisk in the syrup mixture. Stir in the vanilla and pecans. Pour mixture over pears.
7. Bake for 25-30 minutes, until set. Cool before serving.
Ready for baking. The mixture will bubble up as it cooks, but this flattens on cooling.

Now, I suppose it isn't really necessary to make your own pastry, but it really isn't that hard and it is so rewarding. If you're like me and have poor circulation/constantly cold hands - great!! This means you also have what I like to call "pastry hands" and as such, you can work all your pastry with your hands without worrying that you will over-develop the gluten in the flour. If your hands are warm, best to save most of the work for the food processor (pulse flour and butter in step 1 to form crumbs, add egg and water and pulse again until the dough comes together). I also don't own a large food processor, so really didn't have that option anyway. If you are short on time or really just can't be bothered, frozen pastry is an option - just make sure it's good quality (as a general rule, you get what you pay for).

Some lessons in pastry making:
Rub it right - To rub in the butter, make sure your butter is diced as small as possible, then use your fingertips to gently push the butter into the flour. The butter should look like fine breadcrumbs at the end of this process.
- Keep it cool - Work in a cool and well-ventilated area. Also make sure your bench space is cool as this will prevent sticking and overworking of the dough.
- You don't need to knead for long - a few seconds kneading is plenty and will prevent you overworking the dough, making it tough.
- Flour, flour, flour - Keep your bench space and rolling pin floured to prevent sticking.
- Rollin' on - Roll out your pastry in one direction - away from you - then turn 45 degrees and roll again. This will ensure you keep a rounded shape to your dough.
- Don't stretch!! - This is one I know a lot about! If you stretch your pastry at any time, during the rolling or lining process, it will cause it to shrink during cooking.
- Line it up - The easiest way to line your tin is to roll the dough over the rolling pin then transfer it loosely into the tin. Gently ease it into the tin without stretching. Then all you need to do it run the rolling pin over the tin to cut the overlapping edges and Voila! One lined tin! (You'll notice I didn't follow my own advice here. Lesson learned).
This is pre 'stretching-dough-to-fit-case' action... Don't stretch!!!!
 - Prick! - Make sure you prick your base with a fork to stop it rising after the blind bake.

The finished product
So, the verdict? It went down a treat! I did have a few spills over the edge due to pastry shrinkage but that definitely didn't affect the sweet, chocolatey-caramel pecans, the soft pear and the yummy, buttery pastry. A great twist on the traditional pecan pie and the perfect winter dessert served with a lick of double cream.

Enjoy!

Thursday 19 July 2012

"Fete-l" Chocolate

A work colleague came to me this afternoon as he was walking out the door with a few questions. The first, "Are you still scary?". To put this into context, I'd just gotten off the phone with someone from Vodafone in India who I spent more time talking to than I have to my mum in the past month. But that's another story... His second question, "Would it be at all possible for you to bake something for the school fundraising fete? It's OK if you can't, but we're really short on homemade treats to sell. Oh, but I need it to be done by tomorrow." Wow, way to put the pressure on. So, never one to neglect a school duty, I made a quick stop at the 7 eleven on the way home for some eggs and brown sugar, donned my apron, and got into making some chocolate brownies.

These aren't the most sophisticated of chocolate brownies, but they definitely serve as a springboard for many a variation - and they're so easy! You'll need a lamington tray or two slice tins, or any variation on this - obviously, the smaller the tin, the thicker the brownie. I didn't have sour cream - and couldn't be bothered going to get any either - so substituted it with natural yoghurt. You could also use butter milk, just use a tiny bit less and add a little extra melted butter to it.

Chocolate Brownies (about 24 pieces in a lamington tin)
150g butter, chopped
300g dark chocolate, chopped
1 1/2 cups brown sugar
4 eggs, lightly beaten
1/2 cup sour cream
1/2 cup macadamia nuts
Simple ingredients for a tasty treat!
1. Preheat fan-forced oven to 160C. Grease your pan and line with baking paper.
2. Stir butter and chocolate in a small saucepan over low heat until smooth. Transfer to a medium bowl.
3. Stir in sugar and eggs, then flour, sour cream and nuts. Spread mixture into prepared pan. (Warning: The mixture is incredibly addictive. Licking the spoon will result in a tongue-in-bowl reflex).
4. Bake, uncovered, for about 30 minutes. Cool completely in the pan then cut into pieces.
Yummy, gooey brownie batter
A cooling brownie
A few notes for great brownies:
- Don't over cook them. The top hardens slightly on cooling so this is not needed when checking if the brownies are cooked - you want a firm but moist brownie.
- Always cool your brownies in the pan. This will ensure a slightly chewy texture, rather than a crumbly one.

This is a really easy recipe to modify and there are so many variations you could use: substitute the dark chocolate for white to make 'blondies', use different nuts (hazelnuts, pistachios or walnuts all work well), add chocolate chips (white, milk, dark) for an extra hit of chocolate, add fresh or frozen raspberries for a hint of tartness, the list goes on.

After making the brownies, I was feeling a bit excited and wanted to see what else I could come up with. I had the ingredients for a slice I've been wanting to try for ages now (which also happens to be super simple!), so I got on to making a caramel ginger slice.

Caramel Ginger Slice
250g gingernut biscuits, crushed
1/2 cup dessicated coconut
1/2 cup chopped crystallised ginger
3/4 cup caramel Top'n'Fill
1 cup dark chocolate melts (I used chips)
1. Line a 20cm slice tin with baking paper.
2. Combine biscuits, coconut and ginger in a bowl.
3. Place Top'n'Fill and melts into a saucepan and cook over a low heat until melted.
4. Pour caramel mixture into dry ingredients and mix thoroughly. Press into prepared pan and refrigerate until set. Drizzle with additional white or dark chocolate, if desired, then cut into slices.
If this mixture is a little too dry, add a little melted butter to help it along.
Ready for refrigeration
So, I've ended the night with two uber-chocolatey treats to take to school tomorrow. Let's hope they impress and sell like, uh, chocolate hotcakes?

Enjoy!

Saturday 14 July 2012

How much meat can a culinarian eat? (Review)

With a new Churrasco open in Wollongong, and my almost constant hankering for a meat feast, Samba Brazil Bar was the perfect destination for Friday night dinner.

Looking around on arrival, there wasn't much of a 'theme' to the restaurant, and it would have been nice to see some Brazilian inspired decorations to really get us in the mood. After we were seated, we waited for service but the drinks waiters (only two of them for about 60 people) seemed overworked and took a long time to get to our table.

Food began about 15 minutes after the advertised time of 7.30pm and was very slow and disorganised in its distribution. Although it is advertised as a 'Brazilian BBQ', the meat dishes did not begin until close to 8pm and rather, they attempted to fill us up with the selection of sides - rice, black beans, tomato salsa, bread, and the oh-so-brazilian greek salad and potato fries. No way were we being fooled - I was there for the meat feast!
Sides
By the time meats were served, our table was ready for anything but unfortunately due to their being no particular system for where the meats were delivered first, our table missed out on the first round of chicken wings. (Note: At this point I was nearly ready to eat my partner's forearm as a substitute!)

Thankfully, the fact that we had missed out in the first round was quickly recognised and we were soon served, first, with beef sausage (very tasty, but very small) and the meats started flowing from there on.
A fork-full of beef sausage
One of the servers made the observation that we would say yes to any meats on selection and we were subsequently served straight from the kitchen all night.

Stand outs of the selection included the lamb which had, what tasted like, an orange and rosemary rub on the outside; the super tender garlic beef, although this wasn't as good the second time around; the pork neck; and the pork sausage. Unfortunately there must have been a shortage of Babe's brothers and sisters this week, as the two pork dishes only came around once!
The 'carve it yourself' orange and rosemary lamb - tender, juicy and well seasoned!
Arguably the best of the night - a second serving was definitely needed to confirm this.
As much as these meats were super tasty, there were, unfortunately, a few not so great ones amongst them. The chicken sausages were bland and tasted over processed. The rump steak had a 3 centimeter ring of fat on its outer surface which, if rendered properly, would have provided the most amazing flavour, but instead left me feeling like I had just had a swig of straight lard. The chicken hearts, something we've had cooked to perfection before and were really looking forward to, were over-cooked making them rubbery and flavourless.
Rump Steak
Chicken heart
Dessert was served soon after the kitchen had decided there had been enough meat served. I have to say, our table was probably prepared for a little more than we got, and definitely as an advertised "all you can eat" restaurant, we were a bit disappointed the meal ended so soon. As is 'tradition', I suppose you would call it, with Churassco in Australia, cinnamon pineapple was served. Now, the way I have had this in the past has been finger-licking delicious - sticky, sweet, caramelised pineapple with a light dusting of cinnamon to give a subtle but pleasant flavour. This pineapple was a little different... There was way too much cinnamon powder covering the pineapple which wasn't very nice.

So, the food and service left a bit to be desired. However if you just look at it as a different way of eating dinner out, it is pretty fun. The entertainment involved two g-string-clad brazilian dancers and 3 male capoeira dancers doing a routine both outside and inside the restaurant. The overall experience? An interesting one, to say the least. And the main question, how much meat can a culinarian eat? Definitely more than I was served... At least I left room for something sweet later on.

Enjoy!

Tuesday 3 July 2012

Darwin - A culinary destination? (Review)

A short stop-over in Darwin on a trip with Mumma and Sis to El Questro gorge meant dinner needed to be sourced in Darwin CBD (I use the term CBD very loosely, as its more of a small town centre full of dusty utes and rows of open air pubs). As a recommendation from the Virgin travel magazine on the plane, we decided on Char, which boasted 'The best steak in the Northern Territory'. A big claim to live up to.
Arriving at the restaurant, we were seated outside (perfect considering the climate-a balmy 26 degrees), ordered a bottle of wine and marvelled at the extensive menu options-a recent acquisition of the menu from Jellyfish restaurant in Brisbane meant one side of the menu was filled with Darwin's freshest seafood, and the other with the best meat cuts from eye fillet to wagyu.
Making a very tough decision (something my loved ones know doesn't happen easily for me), I chose seared scallops, pork belly, apple and fennel salad with caramel chilli salt for entree. Spectacular flavour combinations made for a great start to the night, though some of the pork belly was a little more like pork crackling than the juicy, melt-in-your-mouth pork belly I've grown accustomed to.
Needing to test the 'best steak' claim, I chose a scotch fillet, mainly for the side of green papaya salad and chilli salt squid than the cut itself.
On arrival, the presentation was simple but inviting, and the chunk of steak sitting atop of the 200 gram cut displayed a perfect medium-rare.
Now, while the steak, squid, salad and additional sides we ordered were a perfect match and the steak was cooked very well, it was far from the best steak I've ever had. Certain areas were sinewey and unpalatable. I blame the cut, rather than the cook and if I was ever to return to Char, I would be ordering the imported wagyu, rather than the local, grass-fed scotchy.
Cooked to perfection
So, Char as 'the best steak in the NT?' Probably, with the right cut choice. Char as a culinary 'must-do'? Definitely worth a look, the decor, outdoor seating, side dishes and waitstaff made for a top night. And the ultimate question - Darwin as a culinary destination? The effort is definitely there, culinarians need not despair, a great meal will be found at one of the many open-air restaurants.
And if not, there's always a cold beer at the pub. Enjoy!

Monday 2 July 2012

A life of lamb roasts

So, much to my Mumma's shock, I have never cooked a lamb roast before. It's always been one of those things that seemed just that little too hard, and maybe not really worth the effort.

Curious to try it out after finding what looked to be a simple recipe in a mag last night, and with Mumma stopping by, I decided to give it a whirl. Oh boy, am I glad I did!

The recipe was a traditional roast - rosemary, garlic and potatoes. Wanting something a little edgier, I sourced a Moroccan lamb chop recipe from Mr Oliver himself and applied it to my 2kg lamb leg. All the sides make for a wonderful feast, definitely one to be shared with the family!

Moroccan Roast Lamb with all the trimmings (serves 6-8)

2kg lamb leg
1/4 cup olive oil
1/2 whole nutmeg
1 tsp ground cumin
1 tsp sweet paprika
1 tsp dried thyme

1 1/2 cup couscous
1 long red chilli, finely chopped, seeds removed
1 bunch flat-leaf parsley, chopped
splash olive oil

8 roasted peppers/capsicum from a jar
8 slices of tasty or cheddar cheese
splash olive oil

Splash olive oil
1/4 red onion, short slices
1/3 cup chopped walnuts
1 bunch silverbeet/spinach, stems removed, roughly chopped
lemon zest
1 tbsp lemon juice

Hummus with olive oil and paprika to serve

1. Preheat the oven to 180°C (fan-forced). Place lamb on roasting tray and score the skin in a criss-cross.
2. Grate nutmeg over the lamb, sprinkle the cumin and paprika. Add about 3/4 of the oil and massage well into lamb.
3. Place lamb in the oven for 15 minutes then turn the temperature down to 160°C.
4. Roast lamb for a further 1 hour 15 minutes. Baste the lamb every 20 minutes with the run-off juices or a little extra oil and spices mixed together. Rest under foil for up to 20 minutes then carve (see note).
Needless the say, the fight was on for the nice crusty outer skin.

5. Couscous: Combine couscous, equal parts boiling water and a splash of oil. Stir then cover for 5 minutes. Fluff with a fork then stir through chilli, parsley and another small splash of oil. Place in a serving bowl.
Fluffy couscous is easy to achieve - just use the 1:1 ratio!

6. Stuffed peppers: Slide cheese slices into capsicum openings. Grill on a medium sized fry pan over medium heat, until cheese has melted. Place on a serving plate.
Surprisingly simple and so tasty.

7. Silverbeet with lemon and walnuts: Heat oil in a high-sided fry pan on medium heat. add onion and walnuts, stirring until walnuts are toasted. Add silverbeet and wilt down, stirring for 2 to 3 minutes. Add zest and juice, season and place in a serving bowl.

The perfect 'green' for this Moroccan feast.
NOTE: When carving, use a straight-edged knife, not a serrated one. Carve across the grain all the way to the bone.

Thanks to this meal, I feel like I have finally accomplished one of the dishes every home cook must know how to do well. I will be making roast lamb for many years to come. Enjoy!

Happy Birthday Tracey!
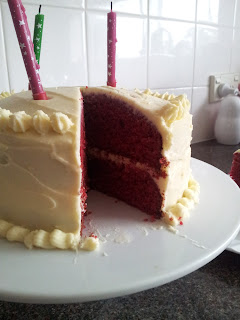
My flatmate Tracey turned 30 (again) this weekend and I wanted to make her something special to remember the occasion by. Now, when I told her she could choose the cake, she immediately headed for the Zumbo cookbook. When she saw the daggers shooting from my eyes, I think she realised that on top of parent-teacher interviews, reports, and the day to day grind of end of term work, I wouldn't be finding much time to create a Willy Wonka-esque masterpiece. She reverted to the humble Red Velvet cake, which I later discovered she had never even tried before!!

So before I give you my recipe, a few hints with Red Velvet. First and foremost - WEAR AN APRON! Red food colouring can be a nightmare to clean so also be sure to rinse and wipe everything well when you're done. Secondly, take your cream cheese, butter, eggs and buttermilk out of the fridge a few hours before you start. This will make the whole process a lot easier, particularly when it comes to making your frosting. Lastly, you will need one LARGE mixing bowl, one MEDIUM mixing bowl, two SMALL bowls and two 20cm cake tins to complete this recipe.

Red Velvet Cake (makes 1 double layer cake or about 24 cupcakes)

2 1/2 cups plain flour, sifted
1 tsp baking powder
1tsp salt
2 tbsp cocoa powder
40 mL red food colouring
120g unsalted butter, softened
1 1/2 cups caster suar
2 eggs, at room temperature
1 tsp vanilla extract
1 cup buttermilk, at room temperature
1 tsp white vinegar
1 tsp bicarb soda

450g cream cheese, softened
120g unsalted butter, softened
1 tsp vanilla extract
3 - 3 1/2 cups icing sugar, sifted

1. Preheat oven to 160⁰C (fan-forced). Line the base, butter and flour two 20 cm pans (I used spring-form, but any cake tin would be fine).
2. In the medium bowl, sift together the flour, baking powder and salt and set aside.
3. In the small bowl, mix food colouring and cocoa power to form a lump-free paste (the consistency will be about the same as a thin batter).
Red cocoa paste

4. In the large bowl, beat butter and sugar together until light and fluffy using a hand mixer. (This step can get VERY messy. Make sure your butter is really soft before you add the sugar and also giving it a quick mix with a wooden spoon to stick all the sugar granules to the butter can also help).
5. Beat in eggs, one at a time, until combined. Then beat in vanilla and cocoa paste making sure to incorporate the left overs on the sides of the bowl.
6. Gently mix in 1/3 flour mix, then half the buttermilk, 1/3 flour, half buttermilk and finish with the remaining flour.
7. In a small, mix vinegar and bicarb. Add to the batter and stir well to combine.
8. Quickly divide the batter between the pans and bake for about 30-35 minutes, until slightly springy and a skewer is coming out clean. (Be careful NOT to take these cakes out of the oven too soon or they will sink). Cupcakes will take about 17 minutes in the oven and may be slightly sticky when you pull them out.
9. Cool on a wire rack for 10 minutes, then remove from pan and cool completely.
10. Make the icing by beating cream cheese and butter together until smooth. Stir in vanilla extract. Sift in icing sugar, half a cup at a time, blending on low speed after each addition. 3-3 1/2 cups of icing sugar will give you an icing that is just stiff enough to hold stars, but still tasting like cream cheese. If you need stiffer icing for more complex decoration, add another half cup of icing sugar.
11. Level out your cakes if needed. Place one layer on your cake plate and top with about half a cup of icing. Spread to within 1-2 centimeters of the edges. Top with second cake layer. Smooth icing over remaining surface, using a palette knife if possible. To decorate, use a piping bag with a small star attachment. The bottom decoration is a "shell" - push icing out then swipe down to finish the shell. The top decoration is a simple star - squeeze the piping bag gently while holding it straight down, release and pull the bag upwards.

The finished prodct
 As you can see below, I have simply done two separate cakes and sandwiched them together. To make it a little more special in the future, I will cut each of those layers in half to make a 4 layered cake. There is plenty of icing with this recipe, so feel free to lather it on.
It's what's on the inside that counts!
If you're looking for the wow factor, this cake is great. A bit of feedback from the eaters has been "wow!", "sensational!", "OMG". Enjoy!

Sunday 1 July 2012

Welcome!

As a busy school teacher, I find my easiest weeknight wind-down is sitting at home curled up with my favourite cookbooks or trawling the internet for the best cafes and restaurants I'm still yet to discover. I'm always so interested to read new recipes and try them out for my friends and loved ones.

My love of food and being in the kitchen comes from my curiosity for trying new recipes when reading a cook book, watching cooking shows, going to a new restaurant, or even just talking about food with my friends. Now, I know there are thousands of food blogs around, so I've had to really consider whether this was even worth my effort to create. And I realised that someone reading this blog could become as inspired by my own curiosity and discover the joy of cooking, just like I have.

Throughout this blog you'll find my quick weeknight meals that save me from the take-away menu drawer (preventing a big dent in my pay packet and a blowout of my waist band). You'll also find the sweet and savoury delights that inspire me to spend hours in the kitchen on weekends. Because my love of cooking comes from my love of eating, a few guest appearances will also be made by the tastiest meals I've had whilst out and about.

Follow me while I indulge my culinary curiosity and maybe even try a few yourself!

Curious to cook, curious to taste, curious to enjoy!